Tips: Offline SharePoint Server 2016 On Premises

Recently I have installed offline SharePoint Server 2016 on premises which took additional efforts especially during the prerequisites of SharePoint 2016.

SQL Server Note:
Before you start please make sure you have install MS SQL Server 2012 SP2 or MS SQL Server 2016 RTM, once installation completed make sure service account is well configured to run SQL Server services and it has db_owner permission on SQL server.

SharePoint Prerequisites:
All you need to install below prerequisites:

1. Application Server Role, Web Server (IIS) Role

2. Microsoft SQL Server 2012 Native Client

3. Microsoft ODBC Driver 11 for SQL Server

4. Microsoft Sync Framework Runtime v1.0 SP1 (x64)

5. Windows Server AppFabric

6. Microsoft Identity Extensions

7. Microsoft Information Protection and Control Client 2.1

8. Microsoft WCF Data Services 5.6

9. Microsoft .NET Framework 4.6

10. Cumulative Update Package 7 for Microsoft AppFabric 1.1 for Windows Server (KB3092423)

11. Visual C++ Redistributable Package for Visual Studio 2012

12. Visual C++ Redistributable Package for Visual Studio 2015

Download components from internet locations:

1. “http://download.microsoft.com/download/9/1/3/9138773A-505D-43E2-AC08-9A77E1E0490B/1033/x64/sqlncli.msi“, # Microsoft SQL Server 2008 R2 SP1 Native Client

2. “http://download.microsoft.com/download/E/0/0/E0060D8F-2354-4871-9596-DC78538799CC/Synchronization.msi“, # Microsoft Sync Framework Runtime v1.0 SP1 (x64)

3. “http://download.microsoft.com/download/A/6/7/A678AB47-496B-4907-B3D4-0A2D280A13C0/WindowsServerAppFabricSetup_x64.exe“, # Windows Server App Fabric

4. “http://download.microsoft.com/download/D/7/2/D72FD747-69B6-40B7-875B-C2B40A6B2BDD/Windows6.1-KB974405-x64.msu“, #Windows Identity Foundation (KB974405)

5. “http://download.microsoft.com/download/0/1/D/01D06854-CA0C-46F1-ADBA-EBF86010DCC6/rtm/MicrosoftIdentityExtensions-64.msi“, # Microsoft Identity Extensions

6. “http://download.microsoft.com/download/9/1/D/91DA8796-BE1D-46AF-8489-663AB7811517/setup_msipc_x64.msi” # Microsoft Information Protection and Control Client

SP Note: As mentioned while installing offline mode you need to install each downloaded files manually in given order but only Windows Server App Fabric need to install through power shell.

Open Windows PowerShell with run as Administrator then run below PS script $SharePoint2016Path = "D:\PreReq"
 Start-Process "E:\PrerequisiteInstaller.exe" –ArgumentList "/AppFabric:$SharePoint2016Path\AppFabric-KB3092423-x64-ENU.exe"

Tips: During installation of prerequisites you will face Error message “There was an error during installation.”, Don’t worry just read the log from the given location and keep running the prerequisites installer until all errors gone.

Configuration Failed

After successfully installed all prerequisites now you can start installing MS SharePoint Server 2016. All binaries will worked fine with you but you may stuck with Error “Configuration Failed” when running the SharePoint 2016 Products Configuration Wizard it keep stuck in step 3 out 10 . This is known issue which I resolved after googled many sites/blogs Thanks to Jim Riekse for brilliant post.

By reading the logs you will end up with this error: Failed to create the configuration database.
An exception of type Microsoft.SharePoint.Upgrade.SPUpgradeException was thrown. Additional exception information: One or more types failed to load. Please refer to the upgrade log for more details.

This issue will resolved by using below steps:

1. Uninstall WcfDataServices
How? On application server go to windows uninstall or program, look for WcfDataServices components and uninstall it.

2. Install Microsoft WCF Data Services 5.6 using Windows Power Shell How?
 $SharePoint2016Path = "D:\PreReq"
 Start-Process "E:\PrerequisiteInstaller.exe" –ArgumentList "/wcfdataservices56:$SharePoint2016Path\WcfDataServices.exe"

3. Delete SharePoint databases
How? Logon to DB server and remove the two newly created SharePoint DBs

5. Rerun SharePoint 2016 Products Configuration Wizard
Now don’t say How? ☺ Just pass the same info and the same Passphrase…

Happy SharePoint Server 2016 Installation…
How to Configure Project Server 2016

In SharePoint Server 2016, one of major change is to include Project Server 2016 as service application therefore separate installation is no longer required. As SharePoint Server 2016 included MSI file and will be installed during the installation of SharePoint Server 2016 Enterprise only.

Here are simple steps to enable and configure Project Server 2016:

1. Open SharePoint 2016 Management shell with run as administrator using the sp_farm account.

2. Enable Project Server License –> Enable-ProjectServerLicense -Key

3. Create new content database of EPM under default Web Application –> New-SPContentDatabase -Name EPMContentDB -DatabaseServer SP2016-DB1 -WebApplication “SharePoint – 80”

4. Create new site collection and linked newly content database –> New-SPSite -ContentDatabase EPMContentDB -URL http://SP2016-BE1/sites/PWA -Template pwa#0

5. It will prompt service account, Enter service account name –> OwnerAlias: DomainName\ServiceAccountName

6. Now enable PWA feature on PWA site –> Enable-SPFeature pwasite -Url http://SP2016-BE1/sites/PWA

7. Finally set PWA site collection security to Project server Permission Mode –> Set-SPProjectPermissionMode -Url http://SP2016-BE1/sites/PWA -Mode ProjectServer

8. Bingo!!! Your Project Server 2016 site is ready to browse http://SP2016-BE1/sites/PWA

Enjoy!

How to make attachment field as mandatory in Custom List

Today I have requirement to make attachment field as mandatory, after many attempts I figure out to handle it from client side scripting.

Here is code to make attachment field as mandatory in Custom List.

Steps are:

1. Create Custom List

2. Edit new item page

3. Add Script Editor web part above the list web part

4. Paste the below code in Edit Snippet code window

5. Save the page without attachment

6. Bingo! You will receive a message “Please attach document”

Javascript Code:

function PreSaveAction() {
var atta = document.getElementById("idAttachmentsTable");
 if (atta == null || atta.rows.length == 0)
{
 document.getElementById("idAttachmentsRow").style.display='none';
 alert("Please attach document");
 return false ;
}
else { return true ;}
}

Reference: https://social.technet.microsoft.com/Forums/office/en-US/7aea371c-e532-4403-a1e7-58aad9e8dd64/checking-in-files-with-required-fields-or-column-values?forum=sharepointgeneral

You can also manage it from designer side by adding attachment control.

<tr>
 <td colspan="2">
 <table>
 <tr>
 <td width="190px" valign="top" class="ms-formlabel">
 <H3 class="ms-standardheader">
 <nobr>Attachments</nobr>
 </H3>
 </td>
 <td width="400px" valign="top" class="ms-formbody" id="attachmentsOnClient">
 <input type="file" name="fileupload0" id="onetidIOFile" size="50" title="Name"></input>
 </td>
 <td>
 <input name="attachButton" type="button" value="Attach" onclick='OkAttach()' />
 </td>
 </tr>
 </table>
 </td>
</tr>


Asim

InfoPath form issue cannot connect to the server

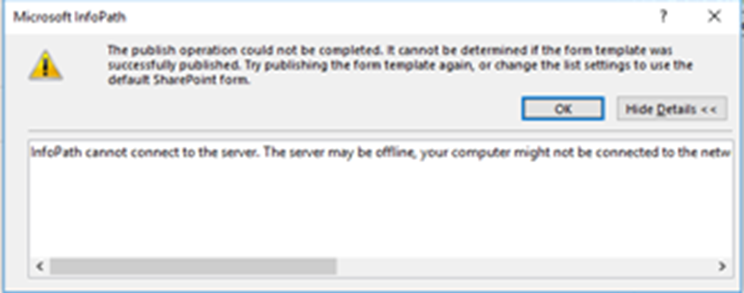
I often receive queries when user publishing the form using InfoPath facing error message: infopath cannot connect to the server. the server may be offline, your computer might not be connected to the network, or infopath forms services might not be enabled on the server. to fix this problem, start by checking your network connection, and then trying again.

InfoPathError

It seems when user tries to edit the default form at site collection level, they are unable to republish it.

In order to fix this problem disable and enable the “IPFSSiteFeatures” which is InfoPath hidden features only viewable by SharePoint Management Shell.

PS C:\> Disable-SPFeature "IPFSSiteFeatures" -url “http://ServerName/Sites/SiteColllection/”

PS C:\> Enable-SPFeature "IPFSSiteFeatures" -url “http://ServerName/Sites/SiteColllection/”

This solution will applies on SharePoint 2010 and 2013 and doesn’t required any downtime while running on production environment.

Reference: https://brenthafnersblog.wordpress.com/2013/01/15/cannot-publish-infopath-forms-or-cutomized-list-forms-in-sharepoint-lists-2010/

SQL Server Setup Failure

Issue:

While installing MS SQL Server 2012 SP3, I faced setup failure message. I googled many solutions such as repair, run scripts but nothing worked for me. As I am unable to run VB Script vbs file that is available on Microsoft KB article http://support.microsoft.com/kb/969052, due to production environment policy same time I preferred not to bypass the policy and fix it by manual steps as indicated in the resolution section.

Error:

TITLE: SQL Server Setup failure.

——————————

SQL Server Setup has encountered the following error:

The cached MSI file ‘C:\Windows\Installer\f is missing.

Its original file is ‘sql_fulltext.msi’ and it was installed for product ‘SQL Server 2012 Full text search’ from ‘C:\Software\en_sql_server_2012_enterprise_edition_with_sp1_x64_dvd_1227976\x64\setup\’, version ‘11.1.3000.0’, language ‘ENU’.

To resolve this problem, recover the missing file from the installation media and start setup again.

For more information about how to resolve this problem, see ‘Steps to restore the missing Windows Installer cache files’ (http://go.microsoft.com/fwlink/?LinkId=144387) in the Microsoft Knowledge Base.

Error code 0x84B20002.

For help, click: http://go.microsoft.com/fwlink?LinkID=20476&ProdName=Microsoft%20SQL%20Server&EvtSrc=setup.rll&EvtID=50000&EvtType=0xD66F84B3%25400xF762992B%25401202%25402

—————————————————————————————————-

Resolution:

Please follow the steps that will help you to fix the setup failure issue.

  1. Read log summary file by access C:\Program Files\Microsoft SQL Server\110\Setup Bootstrap\Log
  2. Read Exit message: The cached MSI file ‘C:\Windows\Installer\msi‘ is missing. Its original file is ‘sql_fulltext.msi‘ and it was installed for product ‘SQL Server 2012 Full text search’ from ‘C:\Software\en_sql_server_2012_enterprise_edition_with_sp1_x64_dvd_1227976\x64\setup\’, version ‘11.1.3000.0’, language ‘ENU’. To resolve this problem, recover the missing file from the installation media and start setup again. For more information about how to resolve this problem, see ‘Steps to restore the missing Windows Installer cache files’ (http://go.microsoft.com/fwlink/?LinkId=144387) in the Microsoft Knowledge Base.
  3. In log file point out two file names in my case 14cb0839.msi and sql_fulltext.msi (I used what I missed as example)
  4. Access MS SQL Server 2012 installation file and search for sql_fulltext.msi
  5. Copy the file on your local computer and rename file sql_fulltext.msi to 14cb0839.msi
  6. Now you may copy the renamed file to C:\Windows\Installer location
  7. Run the SQLServer2012SP3-KB3072779-x64-ENU.exe file (If it will prompt you setup failure message then repeat the step 1 onward until all missing files copied to C:\Windows\Installer location.

Finally setup will run smoothly once all missing files copied to installer location.

Note: The cached MSI file name is unique name which vary from server to server.

Clustr Maps

Provides free HTML link that gives you a tiny map. When it loads, it increments a counter and shows the locations of all visitors to your page, cumulatively (even for huge numbers). Clicking on it zooms in to a big world map, and (optionally) lets you zoom in to the continents, as in the example above. For light users (under 2500 visitors daily) the service is free, forever, and stores cumulative totals up to millions of visitors.

Locations of visitors to this page

How to know who created list or view?

Today I was searching on net, I found many client side solutions using REST API, but the quick solution I discover is PowerShell Script which is more time saving and accurate:

PowerShell Script

# define variables for script
$SiteUrl = "http://yourserver/sites/yoursite"
$viewurl = "http://yourserver/sites/yoursite/Lists/customlist/AllItems.aspx  "
$targetUrl = Get-SPWeb -Identity $SiteUrl
if ($targetUrl -ne $null)
{
$targetFile = $targetUrl.GetFile($viewurl)
if($targetFile.Exists)
{
Write-Host "Created By: " $targetFile.Author
Write-Host "Modified: " $targetFile.TimeLastModified
Write-Host "Modified By: " $targetFile.ModifiedBy
Write-Host "Created: " $targetFile.TimeCreated
}
else
{
Write-Host "File doesn't exist"
}
}

By changing the site collection name and complete list name you will able to get all details such as Created by, Modified by, Modified, Created. As a matter of fact, I was searching who created the survey in which chances are very less that user modified the view using Designer therefore you can easily get who created the survey by checking directly from SharePoint Designer:

Steps from SharePoint Designer:

  1. Open desire site from SharePoint Designer
  2. Navigate to All Files > Lists > “Click Name of List/Survey
  3. Here you can view the Name of the view Modified Date and Modified By.

Note: In case you are looking only for list who created then PowerShell script is recommended option.

Reference Site: https://social.technet.microsoft.com/Forums/sharepoint/en-US/562f551b-68cb-47a9-b3a5-a5b7a275328c/need-to-know-who-created-a-view-in-a-list-using-powershell

Unable to start SharePoint search services?

Many of you have probably been wondering how to start the SharePoint Services from Central Administration i.e. Application Management –> Service Applications –> Manage service applications page.

After many attempts, I figure out the easy way to start the Search services from PowerShell Command, please take a look on the useful commands of PS.

STEPS:

1. Open the SharePoint 2013 Management Shell with run as Administrator permission.
2. Make sure the logged in user has sufficient permission to execute the command.
3. Type Start-SPServiceInstance -Identity
4. Now to get the Service GUID you need to run another PS command Get-SPEnterpriseSearchServiceInstance -Identity “<GUID>”
5. Copy the Id from results and use in the step no. 3 replace with <GUID>
6. You will see the result Status as Provisioning
7. You may check the status from CA http://<SharePointPortalSite>/_admin/Server.aspx

I hope this will save your time.

Reference: https://technet.microsoft.com/en-us/library/ee704549.aspx

Deleting large content objects

If you are deleting large content objects (Files) using Site Settings, then either you need to wait for 30 days which is by default duration for cleansing time or by using sp_Farm account to manually delete the large content files from Site Settings.

Reference: https://blogs.msdn.microsoft.com/ajithas/2009/09/08/deleting-very-large-objects-from-the-second-stage-recycle-bin/